How Can We Help?
EZ Boat Sole Installation Instructions
General:
EZ Boat Sole is a revolutionary new floor that has no wood or paper in his composition, insuring great performance in potentially wet and/or humid applications. The CLICK system that changed the flooring industry is well known today and makes this unique nautical-look floor the easiest marine grade flooring in the market.
The lines commonly called “holly” in the marine trade are aligned from one board to the next with a possible tolerance of 0.5 mm (1/60”), as is normal in this type of flooring. EZ Boat Sole can be installed as a “floating floor” (click only) or it can be glued to the sub-floor (completely or partially, depending of the application). Both types of installations are detailed below. No underlayment is required. EZ Boat Sole backing is already a humidity/vapor barrier and a sound dampener.
HOW TO JOIN PLANKS:
Clicking the boards either on the long side or the short side can be done in two different ways:
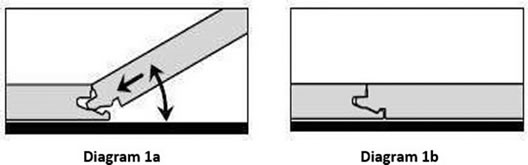
Method A: Angle-In Installation Method
Position the plank to be installed at an angle of 20 to 30° to the plank already installed. Move the plank gently up and down and at the same time exert forward pressure. The planks will automatically click into place. You can either insert the tongue into the groove, or the groove into the tongue. The tongue in groove method is the most
common and the easiest way. See diagram 1A-1B.
Method B: Flat Installation Method
With EZ Boat Sole you can also tap the planks into each other without lifting. For this method you must use the special tapping block. The planks should not be joined with a single tap and the tapping block should be sitting flat on the floor. To avoid damaging the planks you must tap them together gradually. Use this method only in cases where you are unable to use the Angle- In method (see above). The rest of your floor should be installed using the Angle-In method.
Tools For Installing The Floor

- Installation kit (pull bar, spacers (1-8 mm (0.039”-0.315”)), and a tapping block. Installation kits are available at www.PlasTEAK.com.
- Maintenance/cleaning products
- You may also need to cut the planks. To obtain a clean cut, you can use a razor knife, score the board and break it. All other wood cutting tools can be used including a jigsaw, table saw, router, etc.
Key Points
- You can walk on the floor during and immediately after installation, whether the floor is installed “floating” or glued.
- With EZ Boat Sole planks you can choose where you want to begin. Think about what will be the easiest way to install the floor.
- Make sure that the planks are mixed sufficiently when you install them, so that you do not end up with too many identical, light or dark planks next to each other.
- Check all planks in daylight before and during installation. Defective planks must never be used.
- Under normal conditions*, EZ Boat Sole flooring requires no acclimation period. Outside of the normal conditions, let the planks acclimate for 48 hours in unopened packaging at normal room temperature in the middle of the room where the floor is to be installed. (* “Normal conditions” means a difference of no more than 25°F and 20% relative humidity between the stocking/transportation environment of the flooring and the final installation environment of the flooring.)
- Ensure that the end joints of the planks in two successive rows are never in line. Always ensure that the joints are staggered by at least 15 cm (6”).
- We recommend you purchase a few extra boards of flooring. This will be useful to you if you have some damaged pieces, if you miscalculate the size of the room, or if you miscut some pieces. This also will help if your floor needs a repair, but your color is no longer manufactured.
Preparing The Room
Make sure the subfloor is flat. Any unevenness greater than 5 mm (1/4”) over the length of 1 meter (40”) must be smoothed out. The EZ Boat Sole backing will help reduce unevenness. If there is any doubt, lay-down a board over the section of the sub-floor that you feel might not be even. If the board doesn’t lay flat and the blue backing has not absorbed the unevenness, then you need to level this area.
- Make sure the subfloor is clean, dry and stable.
- Flooring may be installed over radiant heat systems.
- Check that the doors can still open and close after the floor has been installed (minimum + 1 cm (3/8”)).